Telescopes and light pixels
I’ve recently been offered a refracting telescope. I’ve always liked astronomy but never got to own one so I have little idea how to use it effectively. You just point and shoot? Oh, that’s for cameras. So you just point and look? More or less but I guess it’s important to know how to use it and, at least, a little about how it actually works. I know people can use telescopes very well just by knowing what works and what does not work. Still I prefer trying to understand the basics about how it works and learn how to predict results. Let’s say, instead of trying 3 configurations of lenses in 2 min, I prefer to read stuff for 1h and then get the configuration right at the first time.
Also, my first Google searches showed me that, regarding this topic, I had a lot of typical misconceptions and simplistic mental models of light. For example, being used to computers when I read that there is a maximum resolution for a telescope I’ve immediately though about pixels. It’s strange, but I had no other model for a limit in imaging. Obviously I did not expect to look through the telescope and see a pixelized Jupiter but what would I see with maximum zoom?
This is basically how I wrapped my head around the basics to predict what can be seen through my telescope. Throughout the rest of the post I’ll be using a KONUSTART-900 as a reference for some of the measurements.
Basics about refracting telescopes
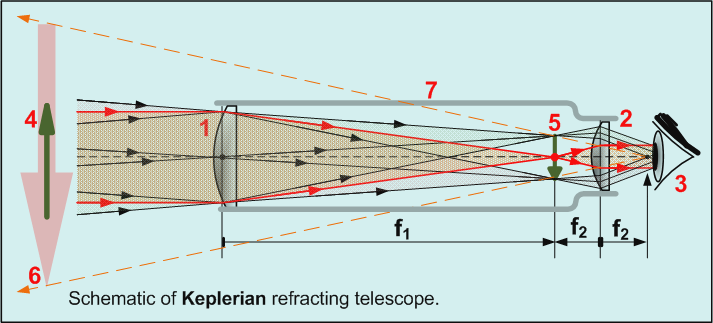
Anyone can read the basics about a refracting telescope in Wikipedia. The basic concept of having an objective that converges rays of light into a focal point is easy to understand. Everyone knows you can burn stuff with a magnifying glass and the Sun. But how does that help see the object? If all light is converged into a point I expected that a lens put farther way from the focal point would be able to provide more magnification as light could expand more and the lens could capture only part of it. But it works precisely the other way around. I could only wrap my head around it after ignoring the red rays, in the above picture, and understanding that a focused inverted image of what is being seen by the telescope will be formed in the entire focal plane (point 5, in the image above).
Instead of thinking about the focal point, I started thinking that from any point in the object being observed originates a infinite number of rays of light in all directions. The goal of the objective lens is then to focus all the different light rays that originate from the same point again into a point at the focal plane. By using Jupiter as an example some point in Jupiter’s red spot would radiate infinite light rays (point 1, in the image bellow). Some of them would read the objective lens at an angle (point 2) and all of them would be focused into one point at the focal plane (point 3). Thinking like this, we can repeat the process for any point from Jupiter and see that a full image is formed at the focal plane.

Angular diameter and focal plane
This means that if we put a photographic film or a CCD image sensor at the focal plane it would record an inverted image of Jupiter, due to the way refraction works. But what size would Jupiter be in the final image? It turns out that, by doing some math, things start to make sense. The key to it is some basic trigonometry relating the size of Jupiter, it’s distance and the telescopes focal length. We also need to know that a ray of light that passes through the middle of the lens suffers no diffraction. The next image shows the scheme that we need to use and out goal is to find ${2h}$.

- ${D = 6.794 xx 10^8 Km}$ (source)
- ${R = 69911 Km}$ (source)
- ${F = 900 mm}$
- ${alpha = arctan(R/D) = 0.0056428º}$
I refreshed my trigonometry functions by looking how to calculate the angular diameter in Wikipedia. In that page we can also see that the angular size of Jupiter, in the sky, is between 29.80 and 50.59 arc seconds. Since an arc second is 1/3600th of a degree we can check that the angle we got is not obviously wrong.
- ${alpha = 0.0056428 xx 3600 = 21.22’’}$ (the angular size of R, that is, half of Jupiter)
- ${2 xx alpha = 40.63’’}$ (the angular size of Jupiter)
We can also calculate the value of ${2h}$ because ${alpha}$ is the same before and after the objective lens.
- ${alpha = arctan(h/F) => 2h = 2 xx F xx tan(alpha) ~~ 0.18 mm}$
A size of less than a millimetre seems very small but lets get an idea of what kind of image could we get by using a 12 megapixel digital camera like the Canon Powershot G9 (the first 12 megapixel camera in the Wikipedia list of sensors). The 1/1.8’’ CCD sensor has an area of 38.20 mm2 which gives a pixel density of 314136 pixels mm-2. Since Jupiter would fit in a square of 0.0324 mm2 that would result in 10178 pixels, that is, a square with more or less 100 x 100 pixels or the picture bellow.

Aperture and angular resolution
The previous picture of Jupiter has 100 x 100 pixels but if we used an image sensor with a greater pixel density we would get a bigger picture, right? Not right. And actually, with that image sensor, the image we would get could not be that detailed because the telescope only has an aperture of 60mm. It turns out that diffraction creates an interference pattern at the focal plane. But what does that mean exactly and why is the aperture relevant?
The Double-slit experiment is well known. The light wave coming from one slit interferes with the light wave from the other slit due to diffraction. But there is a also a “single-slit experiment” which means that diffraction happens whenever there is an obstacle to the light or slit through which it must pass. The resulting interference can be can modelled by considering that, after the slit, each ray of light spreads again in all directions like a wave. This means that each light ray produces a diffraction pattern instead of a point and two points must have enough separation to be distinguished. The image bellow illustrates this situation (more or less) and the minimum separation that permits to resolve two points (the Rayleigh criteria).

The bigger the aperture – the initial hole – the smaller the interference pattern and the easier it gets to resolve points of light close together. Obviously this assumes everything else is perfect: no turbulence in the air, no defects in the lens, an image sensor with infinite resolution, etc. Still it’s interesting to know how many points will the telescope allow to resolve, that is, its resolving power. It allows us to know the maximum amount of detail we can get with the telescope or, more simply, if we would be able to distinguish a binary star system. From the resolving power when can also determine if an image sensor has enough resolution to capture all the detail.
So let’s do some calculations. From the Wikipedia page about angular resolution we can get the formula for the Rayleigh criteria. We just need to choose a particular wavelength. Since the visible spectrum is something between 390 and 700 nm we can choose 545 nm which is considered green.
- ${lambda = 545 nm = 545 xx 10^-9 m}$
- ${D = 60 mm = 0.06 m}$
- ${theta = 1.220 lambda/D = 1.11 xx 10^-5 rad = 6.35 xx 10^-4º = 2.3’’}$
This means that anything that is less than 2.3 arc seconds apart in the sky will not be resolvable and will appear as a single point of light. It’s interesting that typically Dawes’ limit is used. It’s simpler to calculate and would result in 1.93 arc seconds. Since it was determined empirically I guess it is biased towards the particular situation of resolving binary stars in a dark sky. But let’s use the more conservative value because it gives more margin for less perfect viewing conditions.
Based on the previous formulas, Jupiter has and angular size of 40.63’’ and the telescope can has a angular resolution of 2.3’’. This means that we would only be able to see 18 points of detail. Everything else would be interference of the light between those well resolved points. Using the same image sensor we used before we would still get a image of 100 x 100 pixels, just with less detail. Something like what is shown bellow.

The eye
But how would Jupiter actually look to us if we looked through the telescope? We can’t place the eye directly in the focal plane because our eye also has a lens to focus light in the retina. Looking from the focal plane would be like trying to see a Jupiter that was printed directly into a contact lens. Although it changes with age (presbyopia), the standard minimum distance for our eyes is 25 cm (it’s used for example in magnifying glasses). This means that if we looked 25 cm away from the focal point we would be able focus the light in our retina. To figure what would be size of Jupiter we need to do a bit more trigonometry.

- ${F_o = F = 900 mm}$
- ${F_e = 25 cm = 250 mm}$
- ${alpha = 0.0056428º = 20.31’’}$
- ${h = F xx tan(alpha) = 0.0926 mm}$
- ${theta = arctan(h/F_e) = 0.0212249º = 1.27’ = 76.41’’}$
Not bad. Jupiter has a size of 40.63’’ in the sky and 152.82’’ in the focal plane of the telescope when looked at from 25 cm away. This means that if we look through the telescope, having only the objective lens in front of us, we can see a Jupiter that is 3.6 times bigger than the Jupiter we see with the naked eye. Unfortunately we still won’t see much more than a bright point of light because the maximum angular resolution of the human eye is around 1.2 arc minutes. That means that, at best, we can distinguish two points when separated by an interval of 0.6 arc minutes. If the points are closer than that we will see the colors mix and wont be able to tell them apart.
In the picture bellow, A is 100 x 100 pixel image that represents the angular resolution of the telescope, B is same image but with detail blurred in 23.6 x 23.6 squares since ${2 xx 1.27 / 0.6 = 4.23}$ and ${100 / 4.23 = 23.6}$, and C is a representation of our field of vision were Jupiter would still occupy a very tiny, although bright, portion of it.

Eyepieces and magnification
Since the image focused by the telescope is too small to see directly with out eye we need an extra lens between the focal plane and our eye to work as a kind of magnifying glass, but in reverse. Instead of focusing light into our eye it will take the focused light and converge the rays making them parallel when they reach our eye. This has the added benefit of simulating that the light comes directly from Jupiter which means and we can relax the eye, as if looking at the sky, instead of straining it to focus on something 25 cm away.

From the previous calculations with the eye, were we got a 3.6x magnification, we can notice that the magnification was the ration between the angular sizes of Jupiter. If we add the formulas we see that we can ignore the value of h and that the magnification only depends on the focal length of the objective and eyepiece. Here we have to use the small angle approximation where ${tan(theta) ~~ theta => a/b ~~ arctan(a/b)}$ for ${theta ≪ 1}$ but since we’re talking about telescopes and everything we look at is far away the approximation has a very small error.
- ${M = 3.6 = (76.41’’)/(21.22’’) = arctan(h/F_e)/arctan(h/F_o) ~~ (h/F_e) / (h/F_o) = F_o/F_e}$
Maximum magnification
Now the question is: what magnification will provide us the best view of Jupiter? We already know that, with this particular telescope, due to diffraction, the angular resolution is 2.3’’, which means that is the angular distance between well defined points of light. So the magnification we are looking for is the one that allow us to see all those points of detail, that is, which increases the angular separation to at least 1.2 arc minutes in our vision. This way we – or someone with perfect vision – would be able to see all the detailed produced by the telescope.
This is called the maximum magnification because more magnification will not allow more detail to be seen. We can find the maximum magnification simply by dividing the maximum angular resolutions.
- ${M_(max) = (1.2’) / (2.3’’) = (72’’) / (2.3’’) ~~ 31}$
But this requires use to calculate the telescope’s maximum angular resolution. As an alternative, we can start with the initial formula for the angular resolution of the telescope (the Rayleigh criteria) and find some approximation that works well enough. Since the initial formula produced an angle in radians we have to convert 1.2 arc minutes in 0.000349 radians.
- ${M_(max) = (349 xx 10^-6 rad) / ((1.22 lambda/D) rad) = (349 xx 10^-6) / (664.9 xx 10^-9 m) D ~~ 520 D * m^-1}$
In this formula D is in meters so those units will cancel out. Nevertheless, since we are trying to find a simple shortcut, and since apertures are normally stated in millimetres, we can rewrite the formula by removing the units and dividing by 1000.
- ${M_(max) = 0.520 D ~~ D/2}$
This means that we can estimate the maximum resolution by taking the telescope’s aperture in millimetres and divide it by 2. So for an aperture of 60 mm we get a maximum of 30x which is close to the 31 calculated before. Very easy to do. Cool! And what about the eyepiece that produces that magnification?
- ${M = F_o / F_e iff F_e = F_o/M ~~ 2 F_o / D}$, for ${M_max}$
Curiously Fo / D is the focal ration which is a very common metric for telescopes and cameras as it represents the ability to collect light. For example, the KONUSTART 900 is described as “Ø60mm (2.3”) F.900 f/15 REFRACTOR”. So, immediately, we can see that we only need a 30 mm eyepiece to get the maximum magnification. But something seems a bit strange as the telescope comes with two eyepieces and both have a focal length shorter than that. The 20 mm eyepiece would produce 45x magnification and the 8 mm eyepiece 112.5x magnification.
If we can go beyond the maximum what happens, what will we see? We won’t see more detail but it might get easier to see the detail in the first place. For example, the image bellows arguably shows that extra magnification helps see the bands and the red spot. The initial image has 18 points of detail and the others don’t have more detail they just have more pixels with a color obtained from the interpolation of the initial 18.

So why don’t we just go for the eyepiece that provides the maximum magnification? The image above is not actually what we see because two things happen when we magnify:
- Things get blurry because the diffraction pattern and other disturbances like the atmosphere get more noticeable, and
- Things get dimmer because the brightness of an object never increases.
The second point can even sound obvious but it is very important. Depending on the aperture of the telescope, it captures a certain amount of light from the sky. No combination of eyepieces will ever produce more light. So the light that reaches our eye will always be a portion of the light captured by the telescope and magnification decreases the brightness of an object because the same amount of light is spread out by more area.
Minimum magnification
Here we have to consider the eye again because, even with an eyepiece, the last element in the set is our eye and it still imposes some constraints. The main constraint, it turns out, is the size of our pupil. And eyepiece will produce a cylinder of light with parallel rays of light meant for our eye. The diameter of that cylinder of light is called the “exit pupil” precisely because of that and ideally, from a brightness perspective, we would like the “exit pupil” of the eyepiece to have the same size of our pupil thus maximizing the amount of light that reaches our eye. Interestingly enough the size of our pupil decreases with age meaning out eye accepts less light the older we get. But a typical size that is used for this calculations is 7 mm, which is the average size of the pupil at night for a person in her 30s.
To find the size of the exit pupil we can use trigonometry and a diagram similar to the one we used to calculate the size of Jupiter at the focal plane. But in this case we will find the size of the objective lens at the focal plane of the eyepiece.

- ${D_p / (2 F_e) = D_o / (2 (F_o + F_e)) iff D_p = D_o F_e / (F_o + F_e)}$
With this we can already calculate the exit pupil for some eyepiece easily by using all measures in mm. But we can make our life easier by using the relation M = Fo / Fe and some tricks.
- ${D_p = D_o F_e/(F_o + F_e) = D_o F_e/F_o 1/(1 + F_e/F_o) = D_o 1/M 1/(1 + 1/M) = D_o/(M + 1)}$
Now we can easily see that when magnification increases then the exist pupil decreases and less light reaches our eye. For the maximum magnification (30x) we can easily calculate that the exit pupil is around 2 mm. So what is the minimum magnification that creates an exit pupil with 7 mm?
- ${D_p = D_o/(M + 1) iff M = D_o/D_p - 1}$
- ${M_min = D_o/(7mm) - 1 = (60 mm)/(7mm) - 1 = 7.57}$
For the aperture of 60 mm we get a minimum magnification of 7.57 which translates to an eyepiece with around 120 mm (Fe = Fo/M). That is not even a realistic eyepiece we could get. Nevertheless an eyepiece with greater focal length would not allow us to see more light because the light would not enter our pupil and would be wasted.
Brightness
Since with the minimum magnification we get the most light into our eye we can calculate how much brighter will everything seem. For that we just need to compare the area of our pupil with the objective. Since the area of a circle is πr2 (or (π/4) x D2 when we use the diameter) we know that the gain provided by the telescope is
- ${G = A_o/A_e = (pi/4 D_o^2)/(pi/4 D_p^2) = (D_o/D_p)^2 = ((60 mm)/(7 mm))^2 = 73.47}$
But as mentioned, the result of magnification is that the light captured by the telescope is spread by a bigger area and that reduces the brightness of the image. As a magnification M results in a image M times bigger, the area of the corresponding circle will be M2 times bigger and the brightness of each point will be 1/M2 times smaller. Putting this all together we can calculate the brightness of the image seen through the eyepiece (Be) with minimum magnification in relation to the naked eye, that is, when looking directly into the sky (Bn).
- ${B_e = G/M_min^2 B_n = 73.47/57.30 B_n = 1.28 B_n}$
This is kind of sad. At minimum magnification we would only see things 28% brighter through the telescope than from the unaided eye. And, as we saw, the minimum magnification is impossible to get for that telescope. With a 40 mm eyepiece and 22.5x magnification we would get 14.5% of the brightness we get when we just look at the sky. Although things like Jupiter will obviously be bigger, they will be dimmer. Something like the images shown bellow. Typically it is considered that 0.5% brightness (an exit pupil of 0.5 mm) is the limit for seeing so, at that level, we may not even see anything at all, depending on the night sky, atmosphere and all.

Conclusion
So in short, the primary feature of the telescope is the size of aperture. The bigger it is the more it collects light and resolves details. The focal length and eye pieces give a range of magnifications but what we see in each configuration is ultimately connected with the aperture. In particular we can use the F-ratio (FR), which is already a relation between the focal length and aperture, as a shortcut to know some metrics for the telescope.
- ${M_min = D_o/7 - 1}$ where 7 is the size of our pupil, at night, and we can estimate the eyepiece with ${8 xx F_R}$
- ${M_max = D_o/2}$ which we can get with an eyepiece of ${2 xx F_R}$
We should only care for the minimum magnification with “slow” telescopes that are f/5 or less because the largest eyepieces are around 40 mm. Any magnification bigger than Mmax will produce increasingly blurry and dim images. How far can we go depends, once again, on the aperture. Taking again the brightness equation of earlier
- ${B_e = G/M^2 B_n = (D_o/7)^2/(F_o/F_e)^2 B_n = ((F_e xx D_o )/(7 xx F_o))^2 B_n = 1/49 (F_e/F_R)^2 B_n}$
We see that we can make an approximation like ${2 (F_e/F_R)^2}$ by multiplying by 100 and rounding the constant to 2. Although there is a division and a square operation we can easily get some relations by assuming that an exit pupil of 0.5 mm is the minimum for our eye.
- ${F_e = 8 xx F_R}$, the minimum magnification, will get us 128% brightness, that is a little brighter than we get by looking directly into the sky.
- ${F_e = 2 xx F_R}$, the maximum magnification, will get us 8% brightness.
- ${F_e = F_R}$ means 2% brightness in relation to the unaided eye.
- ${F_e = F_R/2}$ means 0.5% brightness and the minimum we can get.
It’s nice to be able to look at an f-ratio like f/15 and know that an eyepiece of 30 mm will get us all the details with decent brightness, an eyepiece of 15 mm will probably allow a better at seeing some details because there will still be enough brightness and that 8 mm is the shortest we can get and requires targets that are already very bright. With these shortcuts, at least, we easily figure what can and cannot work in a telescope. But to have a guess about what will we see with the telescope we need have a target and know the size of the thing. Besides the relative brightness, the size it will show in the eyepiece and it’s original apparent brightness is also important. Still, for anything but the moon, starting the the maximum magnification will be a good start. For nebula and other faint objects, aperture is key because if we can’t see most of then with our naked eye then a small aperture will not help much.